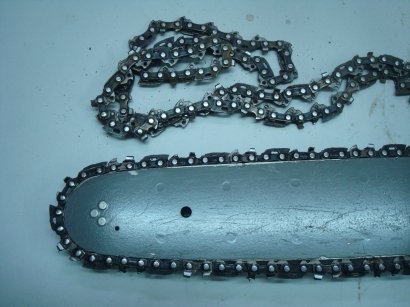
One of the most important parts of a chainsaw is undoubtedly the chain itself. Instead of having a blade, the chainsaw works by having a serrated chain with sharp teeth that constantly spins. Anyone with experience will know that when the chain is put away for storage, it is almost guaranteed that it will tangle unless you intentionally prevent this.
Unfortunately, this is quite unlike untangling your earphones and can prove to be quite the challenge. So unless you fancy using a standard saw for all your cutting work, you’re going to have to untangle that chain.
In this article, we’ll present exactly how to untangle a chainsaw chain, along with all the necessary safety tips and preparations.
Table of Contents
- Safety First
- General Preparation
- How to Untangle a Chainsaw Chain
- How to Prevent a Chainsaw Chain Tangle
- FAQs (Frequently Asked Questions)
Safety First
As mentioned, the chain is serrated, which means it is covered in very sharp teeth. As you plan to untangle it and spend a bit of time handling the chain, it is essential that you prioritize your own health and make sure you have the right safety precautions in place.
Find a Sturdy Workspace
You will only find it more challenging to do this if you try to work in a crowded and uncomfortable area. Space is needed so that you can work efficiently without having anything in the way.
Finding a table or flat surface to work on is good, but as the item we are handling is sharp it is essential that the workspace is sturdy and will not wobble or move if you accidentally nudge it.
Any workbench in a shed that is bolted to either the ground or a wall will work very well, as will any table that is securely placed with all of its legs firmly planted.
Hand Protection
Keeping all of your fingers intact is obviously very important, so to prevent any cutting or slicing, it is best if you wear protective gloves.
Leather gloves and work gloves will be ideal, as they protect your hands without being so bulky that you can no longer effectively work. Anything is better than nothing, as it would preferably be a pair of gloves getting cut up, instead of your own hands.
Other Safety Gear
While I’m not saying that you should attempt this task equipped in an entire bomb squad suit (albeit you would be incredibly safe) it is best to be wearing at least one layer of clothes.
Work pants, a t-shirt, and a hoodie should provide enough protection so that any accidental slip does not end up slicing any part of your body. Protective goggles are also a good idea just in case you drop the chain and it tries to whip at your face.
General Preparation
Now that you have all of your safety measures in place, it is time to get down to the actual untangling itself. Aside from a workspace and protective gear, you are also going to need a lubricant. Engine oil or any lubricating oil will work well enough.
If your chain is old and not properly lubricated then untangling it will be quite a nightmare. However, after adding some lubricating oil to the chain it should start to untangle noticeably easier.
Other than lubricating oil, you will also need some basic tools. To see an exact list of the tools you need, you will need to check the manual for your chainsaw model. Removing the chain from the blade will make the whole ordeal a lot quicker and safer. Most models will require screwdrivers but you may need Allen wrenches as well.
How to Untangle a Chainsaw Chain
How to untangle chainsaw chain
Total Time: 10 minutes
Remove the chain from your chainsaw
To remove the saw chain, chainsaw housing, and guide bar, you’ll need your tools.
Look for two loops that are opposite from each other
To do this, look for two opposite chain loops. With each hand, grasp one loop and hang it freely downwards. They should be hung between the two points you grip.
Make the loops bigger
The next stage is to figure out how to make one complete loop out of two opposite loops. This should be straightforward because you can see how tangled up the chain is. Slacken the chain slightly so that each loop is as large as possible. They should be at least three inches wider.
Untangle the chain
To untangle the chain, the bottom section should protrude and move away from the loops. You may notice that you are looping more and more, but this is natural.
Spread the loops apart
Instead of concentrating on both loops at the same time, try concentrating on just one loop until they all vanish. Make each loop as big as you can.
After removing the chain from the blade and bar, you should be left with a tangled mess of metal. If your chain is brand new, then you need to be careful as it will be razor-sharp.
On the other hand, if your chain is old, it may be rusty and covered in debris. If this is the case, then an oil bath may be a good idea to clean it up and make your job a whole lot easier. Any dirty chain can be cleaned with a simple oil bath.
Once you have the chain ready to untangle, you must identify some naturally formed loops. Find two opposite loops and hold them up. The gravitational force of the chain itself should be enough to help untangle it already.
If not, then keep finding loops and holding them up while your chain untangles itself. While handling, make sure to be careful of the chain’s teeth during the untangling process.
If finding two loops is not helping your issue, hold your chain in a vertical position and let it hang straight. The whole chain should start to move and make your loop bigger. This will lead to a mass of smaller loops at the other end, however, the same technique can be used to get rid of them.
If none of this helps you untangle the chain and it is still very much tangled, then pulling and rearranging different parts is not a bad idea.
Similar to any tangled mess, not all techniques work and sometimes it just requires you to start moving everything around until you eventually untangle it, or at least loosen it enough that you can see the issue. Any kinks can be fixed if you twist them around to be the correct way again.
As anything like this is quite difficult to explain, there is an embedded YouTube video below that gives you a more visual idea of what to do.
Hopefully, your tangled chainsaw chains are now untangled and back in proper working order. A tangled chain isn’t the end of the world and is quite a simple fix as long as you take your time and are careful.
If you make sure to wear safety goggles and take all of the correct precautions, then it really should not be too much of an issue. Keep an eye on the sharp edges and wear chainsaw gloves, especially when dealing with a new chain, but other than that, it is quite safe.
How to Prevent a Chainsaw Chain Tangle
The ideal chainsaw chain tangle is one that never occurs! While it is not always fully avoidable, there is something you can do to lessen your chances of experiencing this chainsaw nuisance. Proper chainsaw and chain care will extend the life and productivity of your chainsaw!
The simplest approach to maintaining your chainsaw chain is to keep it clean, well-oiled, and sharpened. After each use, clean up the trash and keep your chainsaw somewhere it won’t rust or get damaged. If you take good care of your chain, you may be able to avoid tangles altogether!
FAQs (Frequently Asked Questions)
How do I untangle my chainsaw chain?
Remove the chain from your chainsaw first. Then, find two loops that are opposite each other and slacken the chain slightly so that each loop is as large as feasible. You should then be able to unravel the chain.
How do you get a twist out of a chainsaw chain?
Raise the bottom of the dangling chain while holding the loops in your palms. Due to the stiffness of chainsaw chains, the dangling, lowest part will poke straight out like a board until it reaches a vertical position. You may easily guide its movement by just grasping the loops with your hands.
Related Articles:
 How to Measure a Chainsaw Bar & Chain Length the RIGHT way
 Which Way Does a Chainsaw Blade Go On? Chainsaw Chain and Blade Direction Guide
 How to Sharpen a Chainsaw Chain or Blade: Step-by-Step Guide
 Chainsaw Chain Keeps Coming Loose? Causes & Fixes GUIDE
Chainsaw Runs but Chain Won’t Turn? Causes & Solutions
Chainsaw Chain Keeps Coming Loose? Causes & Fixes GUIDE
Chainsaw Runs but Chain Won’t Turn? Causes & Solutions