Do you need to cut tree branches or limbs that you are unable to reach from the ground? This is where a pole saw comes in as the best tool for the job.
The thing is, you need to know how to use a pole saw correctly and safely, to ensure you’re not wasting time or putting yourself or others in danger.
This step-by-step will provide you with all the necessary top tips and advice on the best way to use a pole saw for your trimming and pruning saw requirements.
Table of Contents
- What is a Pole Saw?
- How to Use a Pole Saw Step-by-Step Guide
- Pole Saw Safety Tips
- FAQs (Frequently Asked Questions)
What is a Pole Saw?
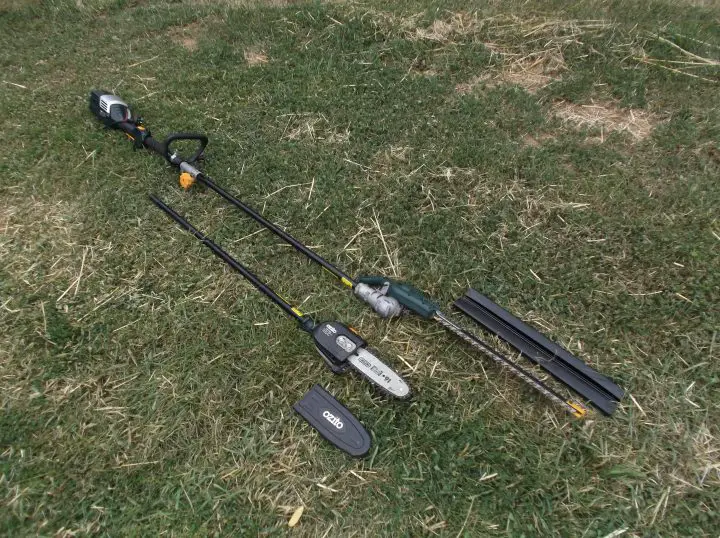
A pole saw is best described as a pruning chain saw or pole pruner attached to the end of a pole. Pole chain saws are great for trimming tree limbs and branches that are otherwise difficult to reach. Instead of using a ladder and feeling rather insecure, the use of a good pole saw is a great idea.
Just like a normal chainsaw, a pole saw is available in different power types – manual pole, electric pole, and gas-powered pole saws. A gas-powered pole saw is like a chainsaw with an extension. They can be quite dangerous but if you’ll be doing a lot of trimming, you may want to consider a gas-powered pole saw as they provide more power. Electric pole saws are easily powered when plugged in with a power cord or connected to a battery pack.
Visit our types of chainsaw guide for more information! Here’s an example of a pole saw readily available on Amazon from Sun Joe:

- Questions, Text 563563 to chat directly with a Sun Joe expert
Prices pulled from the Amazon Product Advertising API on:
Product prices and availability are accurate as of the date/time indicated and are subject to change. Any price and availability information displayed on [relevant Amazon Site(s), as applicable] at the time of purchase will apply to the purchase of this product.
How to Use a Pole Saw Step-by-Step Guide
Using a piece of new equipment for the first time can be quite daunting, as you don’t want to make any mistakes that can jeopardise your work or safety. When it comes to pole saws, you don’t need to fear any more! Now, you will learn how to use a pole chain saw by following these 9 simple steps:
- Creating a safe environment
- Planning your cut
- Position yourself correctly
- Adjusting the pole saw length
- Positioning the pole saw blade
- Starting the cut
- Finishing the cut
- Cleaning up the work area
- Repeat cutting process
1. Creating a Safe Environment
Before starting anything, the environment where you’ll be standing to remove tree branches or limbs should be cleared of people and property that could get damaged. You should also investigate the area to make sure there are no trip hazards around, as you must be able to move freely and easily while you work without risking falling over anywhere.
If you’re working in a public space, it’s always a good idea to rope off the area in order to keep others from getting too close to the work area, especially as you may have little control of where the falling branches or tree limbs land.
2. Planning Your Cut
Don’t just dive in and cut the tree without putting thought into how. You should plan out where you’re going to make your cuts. Take a step, examine the entire tree, and consider all the branches you wish to cut off and a correct approach for each one in the process.
When planning your cuts, you need to figure out how you’re going to access the highest branches that need to be removed. This will result in getting rid of the lower limbs first, more often than not. By removing the limbs that are lower on the tree, you will be able to ensure that you have a clear path to make smooth and safe cuts when you reach the higher branches you want to remove.
Therefore, you must create a plan to cut the lower branches or limbs off of the tree first. Then work your way up to the higher pieces of wood.
3. Positioning Yourself Correctly
The correct position for using a pole saw is to stand off to the side of the branch, so that you can reduce your chances of injury when the wood falls off the tree. Do not stand directly below it as this is putting yourself at risk.
You should make sure that you’re in a position where you can hold the end of your pole saw at chest level and have the pole saw at an angle while you cut. Therefore, you may need to adjust the pole saw to ensure it’s the right length.
4. Adjusting the Pole Saw Length
After you have gotten yourself into the the correct position ready to start cutting, it’s time to adjust your pole saw to the correct height by consulting the owner’s manual to determine how you adjust the length of your specific saw.
You should be able to simply stretch the pole saw out so that the blade of the saw can reach the lowest branch while you remain holding the pole at your chest-height level.
5. Positioning the Pole Saw Blade
Now the pole saw length has been adjusted you can move your pole saw to the branch you need to cut, holding it with both hands. It’s very important at this point to make sure you have control over the weight of the pole saw. This involves feeling comfortable and in control.
When you’re confident, you can move the pole saw blade to the point that it’s resting on the weight of the branch you wish to cut.
6. Starting the Cut
Your first few cutting strokes should be very slow and controlled so you can get a feel for it. Some people also prefer to create a groove in the wood to follow. If you were to cut a branch at full speed straight away, it can result in the blade slipping around and unfortunately making the whole cutting process harder.
However, cutting limbs is different as they’re so thin that you will be able to just cut them quickly.
When aiming to create a groove in a branch, you’ll should begin to cut very slowly at first. Tapping the throttle ever so slightly with your finger or pushing it in lightly can allow you to succesfully make the initial groove in the wood.
This groove will help guide you for the faster strokes you can make afterwards. It’s important to anticipate that the saw can slip sideways while making these initial cuts, especially if the branch is sloped. If and when the pole saw slips, you should immediately stop cutting and reposition the position of the blade on the tree before continuing to cut.
7. Finishing the Cut
Once you’ve created a groove and your saw is secure, you can then increase your stroke speed in order for your cuts to bite deeper. You must keep an eye on the branch at all times as it can still fall unpredictable, regardless of your position. You must make sure you can move out of the way if necessary to prevent an injury to yourself.
8. Cleaning Up the Work Area
After successfully cutting the branch and it has fallen to the ground, it’s a good practice to move it out of the way straight away before making your next cut. Just like in step 1, you want to create a safe environment so that you don’t trip as you reposition yourself around the tree to remove the other branches and limbs.
9. Repeat Cutting Process
Once you’ve removed the first branch, it’s time to get into position for the next cut. Remember, it’s very important to cut all of the lower small branches first, before moving on to the high tree branches up so that you have a clear path. Again, position yourself so that you’re standing off to the side of the next branch you need to cut.
Position your pole saw so that the end of the pole is level with your chest and the blade comfortably reaches the branch. Then you can position the saw blade vertically against the branch so it’s in the cutting position before making your groove cut.
After the groove cut is made, you can increase your sawing speed until you cut through the wood and the branch hits the ground. Move the falling branches out of your way and repeat these steps over and over until you’ve completed your task!
Pole Saw Safety Tips
When it comes to how to use a pole saw, you should always be focused how to use it safely.
Here are some general safety tips to keep in mind throughout using your pole saw:
- Wear the right chainsaw protective gear – this includes a hard hat, gloves, eye protection, boots, and snug-fitting clothes.
- Only cut during the day when it’s easier to see and don’t cut in rainy or wet conditions.
- Make sure the chain has been properly oiled before each cut and only cut one branch at a time.
- Always remove the fallen branch before moving onto the next branch.
- While cutting with a pole chainsaw, be prepared for a kickback. Kickback occurs when the blade tip nicks a hard object or the chain gets pinched. This can send the pole saw blade flying backward so you need to have good control over the tool when you’re operating.
- If the branches are thicker than 8 inches or they’re near or above power lines, do not try this yourself! You need to call a professional.
FAQs (Frequently Asked Questions)
Are pole saws hard to use?
In some cases they certainly can be. Pole saws, especially when using them with extensions to get above 8 feet or manual saws, can be significantly heavy and tiring to work with.
How do you cut branches with a pole saw?
To cut a branch with a pole saw, you need to create a safe environment, plan your cut, position yourself correctly, adjust the pole saw length, position the pole saw blade, and then you can create a groove before starting the cut. Upon completion of the cut, repeat this process by first removing the fallen branch from your work area before moving to the next step.
How big of a limb can I cut with a pole saw?
Depending on the size of the saw and the power potential of the tool, pole saws can be used to cut branches from 2 to 8 inches in size. It is generally recommended that if the branches are thicker than 8 inches you should seek professional help.
What can you do with a pole saw?
Pole chain saws are most suited to trimming tree limbs and branches that are otherwise difficult to reach and not too thick. Instead of using a ladder and potentially feeling rather insecure, the use of a good pole saw can make your life easier.
Related Articles:
 How to Measure a Chainsaw Bar & Chain Length the RIGHT way
 Chainsaw Tips for Beginners – Becoming a Confident Chainsaw User
 How to Tune a Chainsaw – Steps to Tune a Carburetor
 How to Cut a Palm Tree Down with a Chainsaw AND Chop It Up for Removal
 How to Cut Firewood With a Chainsaw – Step by Step GUIDE for Different Types of Firewood