You’ve come to the right place if you’re having trouble reconnecting a chain to the chain bar. You might be enticed to make a repair call or purchase a new chain. These are less practical solutions, though, and both would cost you money.
In this article, we’ll present exactly how to put a chain on a chainsaw correctly, along with our general tips and advice, so that you can resume your duties!
Table of Contents
- Why Do I Need to Readjust or Replace A Chain?
- How to Put a Chain On a Chainsaw Correctly
- How to Check If Your Chain Is Moving in the Correct Direction
- FAQs (Frequently Asked Questions)

Why Do I Need to Readjust or Replace A Chain?
All power tools require regular upkeep and attention. If your chainsaw chain needs to be readjusted or replaced, keep an eye out for the following symptoms:
Some bar screws become looser over time. This has an impact on chain tension. To prevent the chainsaw from being harmed, you must make minor readjustments before operating the saw.
The bar and chain need to be cleaned of any debris if a wood chip becomes lodged in the cracks and becomes trapped in the chainsaw blade or all around the housing. When the engine is used frequently, heat from the motor radiates to the bar, causing the chains to gradually loosen.
It could be necessary to replace your saw chain if it is too old or rusted. The chainsaw’s lifespan is influenced by the type of cutting operations, maintenance, and use. A decent chainsaw chain should typically last for three to five years.
How to Put a Chain On a Chainsaw Correctly
What You’ll Need
- 13mm Wrench
- Screwdriver
- Cardboard or newspaper
- Gloves
Pre-Step Requirement
It’s necessary to set up and clean up your workspace before you begin. Get your newspaper or cardboard out, then spread it out on your work surface. To prevent misplacing or losing any chainsaw components, do not skip this step.
1. Removal of the Chainsaw Sprocket Cover
To begin, it is important to start with safety precautions. First, disconnect the spark plug connector on your thermal chainsaw. This is to avoid any accidents while working. Next, take a 13 mm pipe wrench and use it to loosen the two bolts that hold the housing and the chain guide bar in place.
Once you’ve successfully loosened the bolts, set the housing aside, while keeping the two clamping bolts nearby. This will give you access to the chain guide bar and make the further steps easier.
2. Remove the Chainsaw Chain Tensioner
To access the chain tensioner, begin by unscrewing it with a screwdriver. Make sure that the chain tensioner moves back smoothly. Next, unscrew the cover of the chain spool by turning it clockwise and loosening the wing nut. Keep going, and turn the chain tensioner wheel, located at the level of the bar, to the end.
Remember to always wear safety gloves when performing this task to avoid the risk of hand injuries. Finally, take the chain and guide rail, placing the first on the second, in order to secure it in place.
3. Remove the Old Chain
Using a flat screwdriver, carefully loosen the defective chain from its guide bar. This will allow you to remove the guide bar + chain assembly from the motor pulley.
Make sure to hold on to both parts securely as you go, so that you do not accidentally drop them or cause additional damage. Once you have successfully removed the guide bar + chain assembly, you can proceed with further chainsaw maintenance or repair work as needed.
4. Put the New Chainsaw Chain
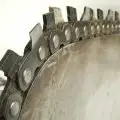
To begin, take the new chain out of its protective case, along with its guide. It is important to check the direction of rotation of the chain by locating the symbol with the arrow on the guide. The cutting teeth should be facing up and towards the front of the guide.
Once you’ve confirmed that the chain is oriented correctly, make sure that the chain is properly inserted inside the guide rail bar. Double-check for any kinks or twists in the chain that might impede the proper functioning. Properly installing the new chain on the guide bar will ensure that it runs smoothly and increases its lifespan.
Tip: To check that a chain is placed properly on its guide, keep it in place at ground level while you grasp the chain by its hand; if the chain knocks the guide out of place, it was not fitted properly.
To begin the installation process, start by passing the chain around the motor pulley. Ensure that it’s placed properly around it. Then, install its guide in the location provided.
It’s crucial to make sure that the guide is securely placed in its designated location. Push the guide all the way toward the pulley to lock it in place. This will prevent the guide from moving during use.
Once the guide is securely in place, iron the chain around the guide. This step helps to ensure that the chain is properly aligned and that it runs smoothly on the guide rail. Ensuring the chain is well in place will ensure the safety and efficient functioning of the chainsaw.
5. Put the Protective Cover of the Chainsaw Back On
With the new chain and guide in place, it’s time to reassemble the protective cover. Hold the guide and chain securely with one hand while using the other hand to reattach the cover. Make sure that the cover is properly replaced and aligned with the guide and chain.
Next, take the two bolts that were removed earlier and tighten them by hand first, and then with the help of a 13 mm wrench.
However, it is important to not fully tighten the bolts yet as it is likely that you will need to recalibrate the chain tension afterward. By not fully tightening the bolts, it will allow for more flexibility and ease of adjustment in the chain tensioning process.
6. Chain Tension Adjustment
To finalize the reassembling process, take a flat screwdriver and locate the adjustment screw below the two bolts that you just reinstalled. The adjustment screw is used to set the chain tension.
To tension your chain, turn the adjusting screw clockwise, whereas, to loosen the chain, turn the screw counterclockwise. It’s important to note that a chain that is too loose can cause the guide to derail with rotation and a chain that is too tight can cause accelerated wear of the chain guide and even smoke if it is not greased.
To check the tension, your chain should hang very partially from the guide, with a maximum deviation of 1 cm. This is the standard measurement that ensures the safety and proper functioning of the chainsaw. When you have the correct tension setting, finally, use the 13mm wrench to tighten the crankcase bolts.
It’s important to double-check the tension after using the chainsaw the first time, and adjust it if necessary. By following these steps, you’ll be sure that your chainsaw is properly calibrated and running safely, and you’ll be ready to tackle any cutting task with confidence.
Visit our How Tight Should a Chainsaw Chain Be? Guide to Keeping the Right Chain Tension for more information!
7. Starting Up the Chainsaw With the New Chain
With the reassembling process complete and the chainsaw chain tension properly adjusted, you are now ready to use your chainsaw. As the chain is driven by the motor pulley, it will start to heat up, which will cause the guide to expand, creating additional tension.
To ensure the smooth functioning of your chainsaw, it’s important to first check the bar and chain oil levels. Effective lubrication is essential to prevent friction and damage to the chain and guide. The oil tank is typically located near the fuel tank and should be refilled as necessary.
On the topic of oil, visit our Chainsaw Oil Types Guide to learn all about the various types!
As you use the chainsaw, it is important to remember to put the protective case around the guide when you are not using it. This will help to avoid possible cuts or damage to the device and chain, especially when the chainsaw is stored or transported.
By taking these precautions, you’ll be able to extend the life of your chainsaw and be able to keep it running smoothly for a long time.
How to Check If Your Chain Is Moving in the Correct Direction
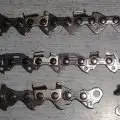
The three-way check should always be performed after making any chainsaw modifications or adjustments. You can use the three-way check to see if the chain has the correct chainsaw blade direction. You have the option of carrying out one or all three steps.
Top View Check
To get a top-view angle, position your chain such that you are gazing down at it. Once you have the chainsaw in your hands, look in the chain’s direction. The sharp edges HAVE to face the same way as the bar blade rotates, clockwise. In other words, all sharp cutting edges or blades should be facing away from you and the chainsaw engine.
Front View Check
From the front, observe the chain’s movement; you ought to see a downward movement. Look where the chain’s sharp edges point; they should be pointing in the right direction. You would have to repeat the procedure if it moved upward and the blades were pointing to the left.
Bottom View Check
The chain should be traveling in the chainsaw chain direction of the motor or chainsaw body when you look at your chainsaw from below.
Learn more about this in our Chainsaw Chain and Blade Direction Guide!
And if you need an idea for when to replace your chains, check out How Long Do Chainsaw Chains Last.
FAQs (Frequently Asked Questions)
How tense should a chainsaw chain be?
While remaining slightly loose on the chainsaw guide bar, a properly tensioned chainsaw chain must be so tight that you cannot pull the drive links out of the chainsaw bar nose.
Related Articles:
 How to Measure a Chainsaw Bar & Chain Length the RIGHT way
 How Long Do Chainsaw Chains Last and When To Replace Them
 Chainsaw Bar Not Getting Oil? How to Fix Your Chainsaw Oiler
 Why Does My Chainsaw Chain Dull so Quickly? Causes & Fixes
 The Difference Between a Chainsaw Ripping Chain vs Crosscut Chain or Standard Chains